When you're ready to schedule your publication, select Schedule from the Home ribbon. You can then configure your scheduling and distribution preferences from the Schedule panel. Scheduling can also be set from the content explorer interface. The Content Explorer also provides an interface for managing your schedules and viewing rendered output.
Note: Administrators can view all schedules in the system from the administrative console.
Important: This feature is not available in the Community Edition.
Opening the Schedule panel
From the Publish ribbon, click Schedule (purple arrow) to open the Schedule panel and begin creating a new Schedule for your publication:

This option also has a dropdown menu, where you can select either to create a New Schedule or view and edit any existing Schedules (Go to schedule listings). The existing schedules are opened in the Scheduling page of the Content Explorer. For more details, see Scheduling.
Tip: If the Schedule button is disabled, you may need to save your publication.
New Schedule
The following sections allow you to configure a new schedule for your publication; defining when to build output documents, where to distribute the output of your publication to (Bulletin Boards, Emails, and so on), and so on.
Tip: If you want to familiarize yourself with a typical use of this functionality, you might want to walkthrough the Schedule step in the Publish Pro Getting Started guide.
Job Details
The Job Details section of the Schedule Panel describes the schedule job itself:
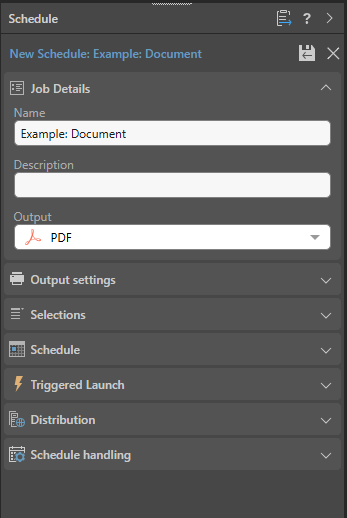
- Name: The name of your publication schedule. This name defaults to match the name of the publication.
- Description: Optional. The schedule's description.
- Output: The format that you would like the publication to be built in. The available output types are: PDF, PowerPoint, Word, Excel, HTML, PNG, CSV, JSON, and XML.
Output Settings
The Output settings section of the Schedule Panel define the options relating to the publication format that you selected in the Job Details section:
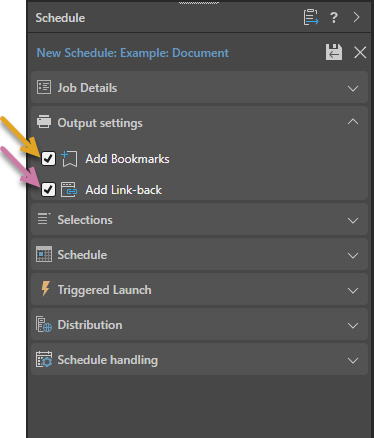
Note: The preceding example shows the Output settings section as it appears for a PDF. The options where you are building a PDF are Add Bookmarks and Add Link-back.
Add Bookmarks (PDF only)
When you are building publications as PDFs, either manually or as part of a schedule or subscription, you can select the Add Bookmark option to create a "document outline" that reflects the headings in your publication. Your readers can then use the hyperlinks in their PDF's document outline to navigate the document.
- Click here for more information about bookmarks
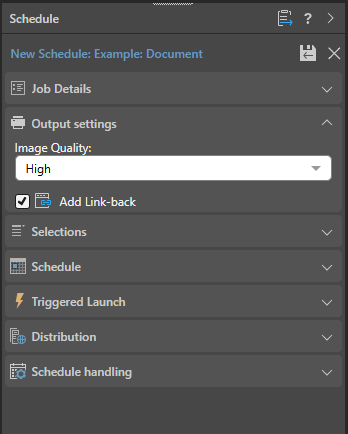
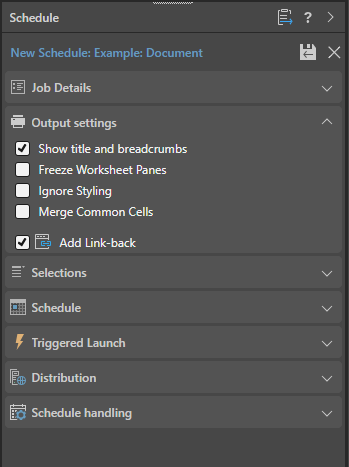
Add Link-back
When you are building publications, either manually or as part of a schedule or subscription, you can select the Add Link-back option to create a link between the visuals in the publication and the "live" version of the same visuals in Pyramid. This allows your readers to click a visual in, say, their PDF to open the latest version of that visual. Once open, they can dynamically interact with the visual, changing slicer selections, and using the options on the context menus as needed.
- Click here for more information about "link-back"
PNG, Power Point, and Word
- Image Quality: Select whether to incorporate images at low, medium, or high quality.
Excel
Once you have selected the Excel option in the Output panel, you can select the formatting options that dictate how your output should be formatted.
Note: When you export your content to a spreadsheet, the filters are typically applied to the output as set at time of printing.
Show Title
Select the Show Title checkbox to include the report name in the exported spreadsheet. By default, this value reflects the saved name of the report as seen in Discover (status bar and app tab).
Tip: You can override this value by specifying a Custom Value as the Title in the Report Title formatting options for the discovery. In this case, the custom value is shown both on the canvas and in the exported spreadsheet. Note that, if you select Breadcrumbs from the Title field, the title in the exported spreadsheet will either be the Custom Value (where a custom value is defined) or the saved report name (where a custom value is not defined).
Context
Select an option from the Context dropdown list to describe the filtering associated with the discovery:
- Light Breadcrumbs: Include a row describing the report hierarchies and measures, followed by selected slicer values in parentheses.
- Enumerated Breadcrumbs: Include a row describing the report hierarchies and measures, followed by the slicer name and selected slicer values as colon-separated pairs.
- Explicit Details: Add all Breadcrumb details to the spreadsheet as a table of details. The details include Slicers and Parameters and their selected values and details of any Sort and Filter captions that are currently filtering the content of the visual.
- None: Don't include any context information.
Freeze Worksheet Panes
Not relevant to Grids. Freeze the panels in your worksheet to keep the header information (title, visual, context, and the header for the data table) visible while you scroll through the data in the rest of your worksheet.
Ignore Styling
Matrix Grids only. Do not export styles from the source to the target spreadsheet.
Ignore Font Styles
Matrix Grids only. Do not export font styles from the source to the target spreadsheet.
Merge Common Cells
Matrix Grids only. Where adjacent or contiguous cells contain the same content, merge those cells. This has the same effect as the Merge and Center tool.
Encode URLs
Select the Encode URLs checkbox to automatically replace some "unsafe" characters in URLs, such as spaces, colons, or slashes, with their corresponding encoded values. For example, selecting this option replaces ?search=hello world with ?search=hello%20world in the exported spreadsheet.
The relevant "unsafe" characters are: < > \ / ? & # : ; = and Space.
Remove value-based filters
Where a value-based filter has been applied to data, select this option to remove that filter and export the entire dataset rather than only the filtered values.
Note: This option removes value filters and not slicer filters. As an example, it removes value filters that limit data based on values and metrics, such as top 10% of sales, but does not remove the filtering effect of slicers, such as where France is the element selected from a Country slicer. For more information, see Value Filtering in Discover.
For more information, see Exporting to Microsoft Excel.
CSV, JSON, and XML
Note: Exporting and printing to JSON, XML, and CSV is not available in the Community edition.
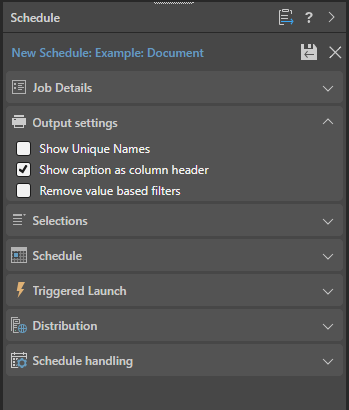
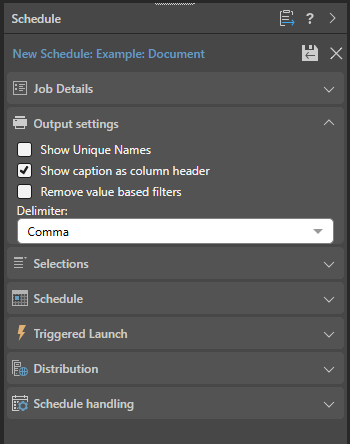
Show unique names
Include unique names for each value.
Show caption as column header
Include the caption as a column header. Where this option is not selected, the column header caption is null.
Remove value-based filters
Where a value-based filter has been applied to data, select this option to remove that filter and export the entire dataset rather than only the filtered values.
Note: This option removes value filters and not slicer filters. As an example, it removes value filters that limit data based on values and metrics, such as top 10% of sales, but does not remove the filtering effect of slicers, such as where France is the element selected from a Country slicer. For more information, see Value Filtering in Discover.
Delimiter (CSV only)
Indicate which character should be used as a delimiter in the CSV. This can be one of Comma, Pipe, Semi Colon, Space, and Tab.
For more information about removing value-based filters, see Removing Value-Based Filters from Text Exports.
The following example shows the Output settings for PNGs, Power Point presentations, or Word documents:
The following example shows the Output settings for Excel spreadsheets:
The following example shows the Output settings for JSON or XML output:
The following example shows the Output settings for CSV output:
Selections
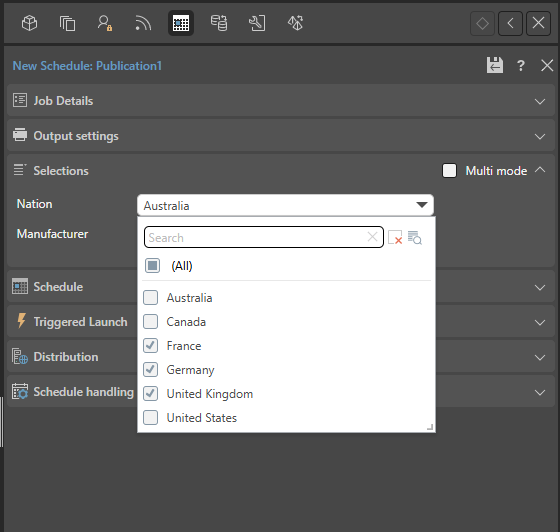
The Selections section of the Schedule Panel defines which values should be used in the slicers when the publication is built:
- Basic: If you do not select the Multi mode checkbox, you need to select the value or values to apply for each of the slicers in the publication when it is built on this schedule. For example, if you have Country and Manufacturer slicers in your publication, you will need to select the country (Australia, say) and manufacturer (ACME Corp) whose details should be used in the publication.
- Multi mode: If you select the Multi mode checkbox, you can select multiple values from each slicer to produce multiple copies of the publication; each of which is filtered by different values. For example, if you have the same slicers and select Multi mode, you publish a document for every country with one particular manufacturer, or for every country / manufacturer pair.
Note: The Selections section is only displayed if there are slicers in your publication.
Basic
Allows you to select an element or a set of elements for each slicer in the publication; filtering the publication according to the chosen elements:
Note: This functionality is the same as that used when you manually build your publication. One document is produced, filtered by one set of slicer options.
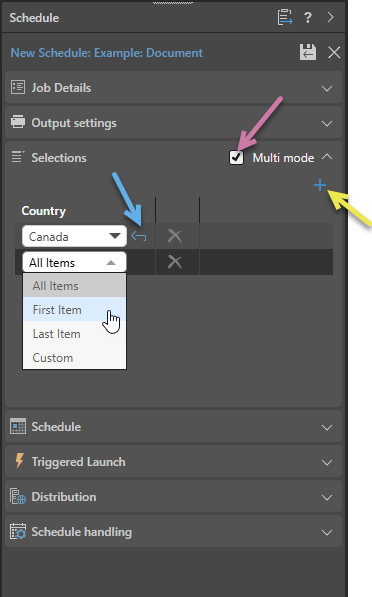
Multi mode
Allows you to select multiple values for each slicer and produce multiple copies of the publication, with each copy filtered by different values from the slicers.
To schedule building multiple documents with different slicer values:
- Select the Multi mode checkbox (purple arrow below).
- The dropdown lists indicate which values to select for the slicers:
- Every Item: Select all slices in the slicer (as described previously).
- First Item: Select the first slice in the slicer.
- Last Item: Select the last slice in the slicer.
- Custom: Enable custom selection of a slice. Once you have selected Custom, you use the dropdown list again to select the custom slice. For example, to select Canada from the list of Countries.
- If you want to specify different combinations of items; for example, if you want to publish documents for All Manufacturers in Canada and one particular Manufacturer in the United States; you need to create multiple rows to define your selections:
- Click Plus (yellow arrow) to add a slicer selection.
- For each slicer, open the dropdown list and select the "slice" type as above:
- To create a publication for each Manufacturer in Canada, you need to select Canada from the Country slicer (Custom) and Every Item in the Manufacturer slicer.
- To also create a publication for the Manufacturer ACME in the United States, you need to add a row and select United States from the Country slicer (Custom) and ACME in the Manufacturer slicer (also Custom).
By default, a table is created with a column for each of the slicers in this publication. The default selection for each is Every Item. If you accept this, your scheduled publication will be built for every possible combination of slicer items. This means that, if your slicers are Country and Manufacturer, you will create one publication for each manufacturer in every country (nine publications in total if your data includes three countries and three manufacturers).
Additional options
- Back: (Blue arrow above.) If you selected a Custom value, use the Back button to clear your selection from the dropdown list.
- Delete: Remove a set of slicer selections, by deleting the row.
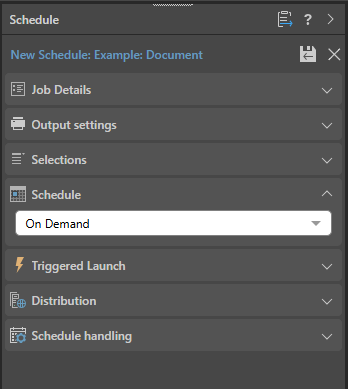
Schedule
The Schedule section of the Schedule Panel determines exactly when your schedule should run.
Once
Select Once from the dropdown list to run the schedule once only, either immediately or at a specified time and date:

- Now: The schedule will run immediately.
- Delayed: The schedule will run at the specified time and date.
Timezone
Select the required timezone from the Timezone dropdown list. The schedule will run according to the selected timezone.
Recurring
Recurring schedules run on a regular frequency. Once you select the frequency of the schedule, you can set it to run at specified intervals; for example, every Monday, every quarter, or every two weeks:
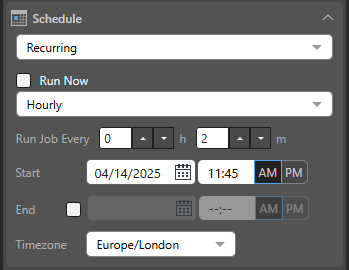
- Run Now: Select this checkbox to run the schedule immediately.
- Hourly: Run the job every x hours and y minutes, starting from the specified Start time and date.
- Daily: Run the job either on the selected Specific Days or every x days (Days Interval).
- Weekly: Run the job every x weeks on the selected Days.
- Monthly: Run the job every x quarter, month, or all, based on the following pattern:
- Week and Days: Run the schedule during the specified week of the given months, on a given day.
- Calendar Days: Run the schedule on a given calendar day or on the last day of the month.
- Workdays: Run the schedule on a specific working day (Days) during the month, or on the last working day of the Month.
Tip: Your First Workday is configured by the Administrator as part of the tenant default configuration. Your workdays are typically Monday through Friday.
Start and End
For each recurring schedule option:
- Start: The date and time when the job starts running. All schedules need a Start date and time.
- End: Optional. The date and time when the job will stop running. If no end date and time are given, the schedule will continue running indefinitely.
Timezone
- Timezone: The timezone that your schedule should occur in. This is particularly important when building publications for a global audience.
On Demand
On Demand Schedules are used to trigger the rendering of specified publications, alerts, and subscriptions when the underlying data models are reprocessed.
To configure on demand scheduling for the subscriptions, choose On Demand from the Schedule section and configure on demand subscriptions for the relevant data models through the Master Flow or using the API.
- Click here to learn more about configuring the schedule.
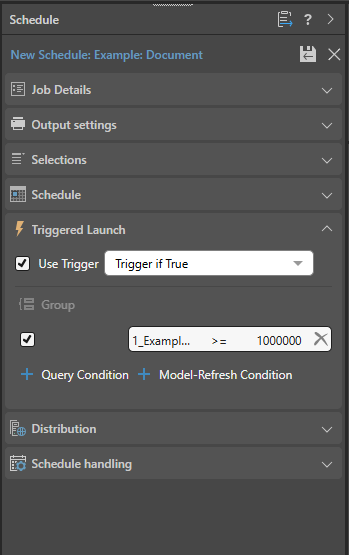
Triggered Launch
Schedule your publication to only run if a certain condition or a series of conditions are met. Triggers are driven by query results. You can configure your own custom triggers, including model-refresh triggers, that will render publications and run alerts and subscriptions when the underlying data model is reprocessed. The trigger condition is defined using PQL.
- Click here to learn more about configuring a triggered launch.
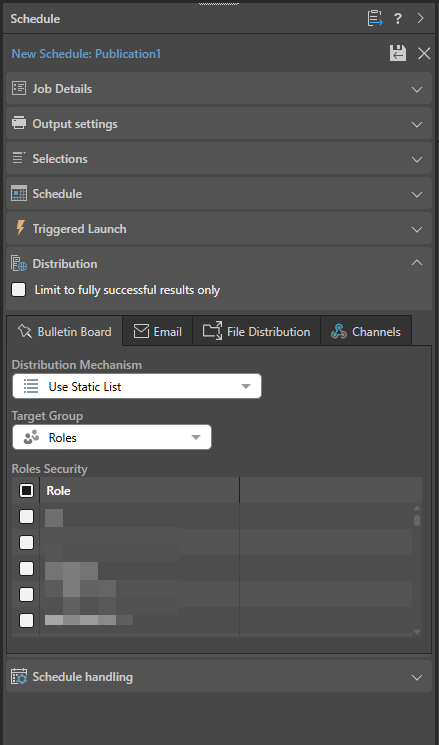
Distribution
Determine how your publication will be delivered to any recipients. Publications can be distributed using Pyramid's bulletin board, one or more email addresses, or Webhook channels, as defined and configured in the Distribution section or the Schedule panel.
- Click here to learn about distribution options
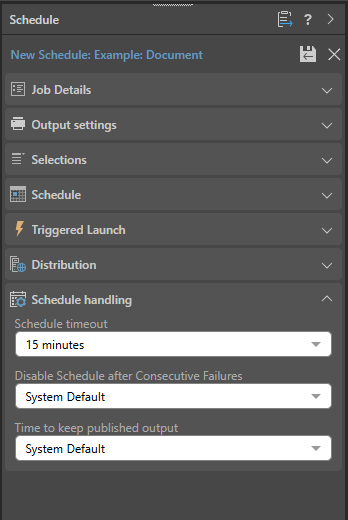
Schedule Handling
- Schedule Timeout: Disables the scheduled task after the given amount of time.
- Disable Schedule after Consecutive Failures: The maximum number of consecutive failures allowed before the schedule is disabled.
- Time to Keep the Published Output: The length of time to keep rendered content (published output) for. This includes prints, publications, and subscriptions. The time set here cannot be greater than the overriding time set by the administrator in the system schedule.
Note: Selecting System Default for these options applies the default setting created by your administrator in the System Schedule.
Launching Schedules
Once you are done building your schedule, click Save (purple arrow below) to save and launch it. You can view the schedule's progress in the Content Explorer (or from the Admin Console if you are an admin):
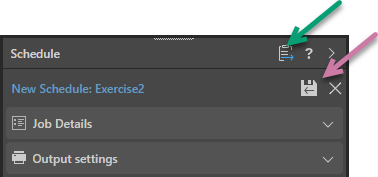
Note: When viewing your schedule in the Publish app, there is an option to go to the Schedule list in the Content Explorer (green arrow above). This provides access the publication's schedules for edit, delete, and so on and view any built publications.
Related information
Data Source Authentication
If you’re using Windows Authentication or SAP Logon Tickets to connect to your data source, you may be prompted to enter Authentication credentials when saving your changes.
- Click here to learn more about Data Source Authentication.